Preparing Your Site for a Shed | 8 Essential Steps for a Successful Installation
The process of installing a new shed involves more than just the construction of the structure itself. A crucial preliminary step is to prepare your shed site for construction. Laying the groundwork properly can make the difference between a shed that stands strong for years and one that faces issues down the line.
Today, we’ll walk you through the essential steps you need to take to prepare your site for a shed. By following these steps, you’ll be ensuring a smooth installation process and a shed that stands the test of time.
The importance of site preparation
A well-prepared site ensures that the shed is installed on a stable and level surface, reducing the risk of structural issues down the line. It helps prevent problems such as uneven settling, which can lead to distortion or cracking in the shed’s structure.
Good site preparation also aids in proper drainage, preventing water buildup that could potentially cause damage to your shed over time. Additionally, preparing the site enables you to check and comply with any local building regulations regarding the placement of outdoor structures.
In essence, the effort put into site preparation can significantly enhance the lifespan and functionality of your shed, and ensure a smooth and successful installation process.
1. Evaluating the space
Evaluating your available space is an essential step in preparing your site for a shed. There are several factors you need to consider in this process.
Size: measure the area where you plan to place the shed. Ensure there is enough space not just for the shed itself, but also for doors to open and enough clearance around it. You’ll want room to move around the shed easily, especially if you plan on using it as a workspace.
Access: consider how you’ll access the shed. Is there a clear path to the proposed location? Think about the larger items you might need to move in and out of the shed and whether there will be any obstructions.
Proximity to Utilities: if you’re planning to have electricity or water in your shed, you’ll need to consider its proximity to utilities. It’s easier and less expensive to run utilities to a shed that’s closer to the source.
Regulations: ensure that the proposed location complies with local zoning laws and homeowners association rules. Some areas have restrictions on where sheds can be placed, especially in relation to property lines and other structures.
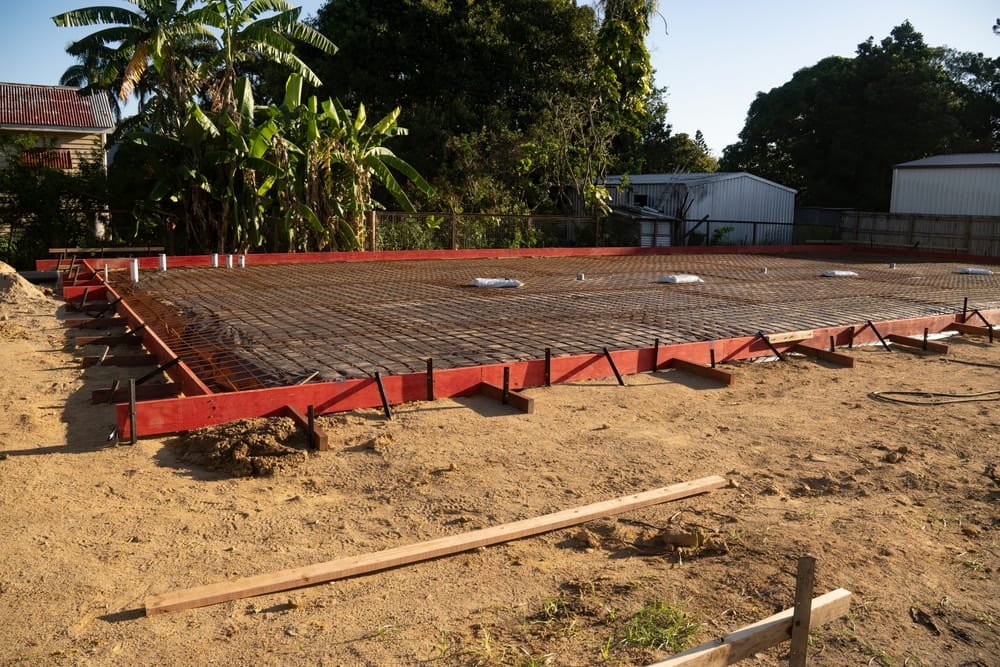
2. Levelling the ground
A level base is essential to the stability and longevity of your shed. Below are some step-by-step instructions and tips on how to level your ground.
Step 1 – Remove all Organic Material: start by removing any organic material from the area, such as grass, leaves, roots, or other debris. Organic materials decompose over time, which can cause the ground to sink unevenly and destabilise your shed.
Step 2 – Compact the Existing Natural Ground: before you add any fill material, compact the existing ground. This step is crucial to remove any air pockets that might lead to ground settling over time. You can rent a compactor from a local hardware store to ensure the ground is firmly packed.
Step 3 – Add Cleanfill Sand: next, fill the area with cleanfill sand. Cleanfill is easy for contractors to work with when digging footings and creating a consistent slab thickness. Ensure the fill material is free from organic matter or anything else that could decompose over time.
Step 4 – Consider the Footprint: when preparing the ground, plan for a minimum of 1 m clearance on all four sides of your shed. This space gives contractors room to work and allows for the final setup of the pad. It also helps prevent washout if you’re building up the pad. If the sand washes away, it could cause the concrete to crack.
Step 5 – Level the Ground: once the sand is in place, level the pad. It’s important to get the ground as level as possible so that the concreter can finish the job without any issues. Some contractors might charge extra if they have to level the pad themselves.
Step 6 – Compact the Fill Material: finally, compact any fill material you’ve added. Like with the natural ground, this step removes air pockets and ensures the pad won’t settle unevenly. If possible, consider conducting a compaction test. This test can help confirm that the ground is adequately compacted and ready for the concrete pour.
While DIY shed installation can be an exciting project for some, it’s often a larger task than most people realise. Site preparation, especially levelling the ground, can be a complex and demanding job. In fact, many people opt to hire a professional bobcat or earthworks company to handle this process.
The main advantage of hiring a professional is the assurance that the job will be done right the first time. Improper site preparation can lead to numerous issues down the line, including an unstable shed or cracked foundation. A professional will be aware of these potential problems and know how to avoid them.
3. Ensuring proper drainage
Without adequate drainage, water can accumulate around your shed, especially during periods of heavy rainfall. This accumulation of water can lead to several problems, such as causing the ground around your shed to become soggy, which can compromise the stability of your shed. Over time, it can lead to structural damage and could even cause your shed to sink or become unlevel.
In addition, consistent moisture exposure can lead to rust and the growth of mould and mildew. This can damage your shed’s walls, flooring, and any items stored inside. It also creates an unhealthy environment inside your shed.
To ensure proper drainage, first, observe your yard during a heavy rain before choosing your shed site. Avoid placing your shed in areas where water tends to collect. If your chosen location tends to become waterlogged, consider building up the ground with additional soil or creating a gravel base. Both methods can help to elevate the shed and encourage water to flow away from it.
Installing guttering and downpipes on your shed can also help manage rainwater by directing it away from the base of the structure. Additionally, landscaping the area around your shed with plants or a grassy lawn can also help absorb water.
In cases where drainage issues persist, you may need to consider more comprehensive solutions such as French drains or other types of yard drainage systems. These solutions help divert water away from your shed and other structures, keeping the area dry and safe.
4. Clearing obstacles

Any trees, rocks, or structures within your chosen area can potentially hinder the installation process and even impact the overall functionality and safety of your shed.
Trees pose several problems. Their roots can interfere with the stability of your shed, and over time, as the tree grows, these roots could potentially lift or distort the shed’s foundation. Additionally, overhanging branches might drop leaves onto your shed, which can clog gutters and cause moisture issues. Not to mention, in severe weather conditions, branches or even the whole tree could fall and damage your shed.
Rocks and other large debris in the soil can create an uneven surface, making it difficult to properly level your shed’s foundation. An unlevel shed can lead to numerous structural issues over time, from doors and windows that won’t close properly to serious structural instability.
Existing structures could also pose a problem. For example, fences or walls might restrict access to the site, complicating the installation process. Before removing any fencing, make sure to notify your neighbours and address any fence replacement that needs to take place.
5. Utility connections
If you plan to use utilities like electricity or water in your shed, it’s important to consider how these will be connected during the site preparation phase.
Electricity: you might want electricity in your shed for lighting, power tools, or other appliances. To install electrical connections, you’ll need to run a line from your main circuit panel to your shed. This usually involves digging a trench and laying conduit. It’s a good idea to mark out the path of the electrical line during the site preparation stage. However, it’s worth noting that this kind of work typically involves working with high voltages and should be carried out by a licensed electrician.
Water: if you need water in your shed, you’ll need to connect to your home’s water supply. Like with electrical work, this usually involves digging a trench and laying pipe. This work should be done by a qualified plumber, and you may need a permit to carry it out.
Check out our blog on Running Power to Your Shed in Australia and discover the different power options available for your new shed.
6. Foundation considerations
When it comes to building a shed, choosing the right foundation is critical. The foundation provides stability and support to your shed, and it protects the structure from moisture and pests. The choice of your shed foundation should depend on several factors, including the size and purpose of your shed, the type of soil, and your budget.
Concrete Slab: a concrete slab foundation is a solid choice for large sheds, heavy-duty workshops, or sheds that will house heavy equipment. Concrete slabs provide a high level of stability and can bear a lot of weight. However, they are the most expensive type of shed foundation and require more preparation and labour. It’s also worth noting that they’re permanent, so you’ll want to be certain of your shed’s location before you pour the slab.
Pier and Beam: pier and beam foundations consist of wooden beams that rest on concrete piers. This type of foundation is ideal for sheds that are built on sloping ground, as the height of the piers can be adjusted to level the shed. While pier and beam foundations are cheaper and easier to install than a concrete slab, they still provide excellent stability.
Concrete Blocks: a more budget-friendly option is to use concrete blocks. Blocks can be set into the ground and levelled to provide a solid base for your shed. This type of foundation is suitable for small to medium-sized sheds and those that won’t be holding heavy equipment.
For more information regarding the topic of shed foundations, check out our blog on Concrete Slabs: Everything You Need to Know.
7. Preparing access routes
To start, take into account the size of the shed and any delivery vehicles that will be used. Make sure that any gates or openings are wide enough for the shed or materials to pass through. You’ll also need to consider overhead obstacles such as low-hanging branches, power lines, or other structures that might interfere with the delivery or installation.
Next, observe the ground conditions of your access route. The path should be firm and level to support heavy foot traffic and the weight of the shed or construction materials. If the ground is soft or muddy, you might need to reinforce it with gravel or wooden planks to prevent vehicles from getting stuck.
Turns and bends in your access route are also worth considering. Sharp turns might be challenging to navigate with a large shed or heavy materials. If such turns are unavoidable, ensure there is ample space for manoeuvring.
8. Permits and regulations
The specifics can vary from one council to another, but generally, you’ll need to submit a building application that includes detailed plans of the shed and site, showing dimensions and materials, and how the shed will be used.
There are exceptions for small structures. For example, sheds that are 10 square metres or smaller and are not used for habitation may not require a permit. For more information, check out our blog on Planning Permission & Council Approval for Sheds.
Receive professional help
At Spinifex Sheds, we have over 10 years of experience installing custom built sheds in Perth. Our team takes care of everything! Whether it’s getting council approval, organising the concrete base, or cleaning up after the build is complete, you can count on us.
We offer all sorts of ranbuild sheds in Perth, from your common storage shed to more complex structures like workshop sheds, commercial sheds, and more. Discover our range today and don’t hesitate to contact us if you have any questions regarding our products or services.

SIMON BUSBY
Owner - Spinifex Sheds
I've got a passion for helping people build the right shed. Whether that's custom made for your hoist, fitting the shed into a tight site or just a shed that's going to last many years, I love to help.
Similar Articles

How to Organise a Storage Shed
A shed’s meant to be useful, not a dumping ground. If yours is a mess—tools buried under junk, no space to move—it’s time to sort it out. And here’s the thing: a proper shed, built right from the start, makes organisation easy. If you’re constantly battling clutter, maybe the problem isn’t your organisation, it’s your shed. Let’s get it sorted. Here’s how to organise a storage shed the right way.

How to Weatherproof a Shed (The Right Way)
With the diverse and often harsh Australian climate, it’s important to ensure that your shed can withstand everything from scorching sun to torrential rains. At Spinifex Sheds, we don’t just slap together sheds—we build them right. With top-quality materials and expert craftsmanship, we make sure your shed is weatherproof, durable, and made to last. Here’s how to do it properly, with the right team on the job.

Is It Worth Repairing a Shed? Here’s What We Think
As Aussie homeowners, the state of our backyard sheds often takes a back seat until significant issues become too big to ignore. But the question that comes up time and time again, is if it’s worth repairing a shed, or are you better off just replacing the entire structure?